Friday, November 30, 2012

Make Your Own Ornament Tree

Ornament Christmas Tree for a Table or Mantel
Article found HERE

How to make a knitting needle Tabletop Christmas Tree
Experiment with different style balls and your favorite colors.   Use all one color or try a different color for each size ball you add to the knitting needle or try four balls of varying sizes in each color. This will give you a spiral effect.

How to Make the Knitting Needle Ornament Tree

Supplies Needed:

A mix of round Christmas ornaments in 4 different sizes –for one tree you will need about 20 balls.  At least 4 of each size.
Knitting Needle – 14 inches long (tall tree)  Spray paint the needles if needed to match your ornaments.
Optional: Christmas tree peak topper or a star ornament, ribbon spool, spray paint, scrapbook paper, glue, spray paint, paper cutter
Supplies-Needed to make an ornament Christmas Tree
To make the ribbon spool tree stand: Spray the spool with spray paint to coordinate with your ornaments.  Cut scrapbook paper the width of the spool. You could use ribbon, but I like the more finished look of the paper on the spool.
Decorating for Christmas

Attach the paper with glue. I used Aleene’s Tacky Line Roll Adhesive.
Holiday decorating ideas for Christmas
Attach to the spool.
Ribbon-and-Scrap-paper-stri
Thread the knitting needle up through the bottom of the spool.
Needles-in-Spools

If the spool has a large hole – you can stuff it with pieces of STYROFOAM to make sure the needle stays straight.
Spools-and-Needles

String four large Christmas ball ornaments (about 4” diameter) onto the needle, slipping the metal loops on the balls over the point of the needle. These four balls will form the base of the tree.  If you do not want to use the spool tree stand  and want to make the basic tree – the four balls when placed  squarely on a table will hold the needle upright.
Tabletop Knitting Needle Ornament Tree instructions and tutorial

Next string onto the needle four balls of a slightly smaller size. Each one will fit between two of the larger ones.  Then string on another four, slightly smaller, and finally four more again, slightly smaller, so that your tree has sixteen Christmas ball ornaments in all.  You can add more or less depending on the size of your balls.
How to make a ornament tree using a knitting needle
The tip will look like this.
Ideas for Chistmas decorating

On top of the needle place a Christmas star ornament.  I found this one at Michaels.  It had a “spring” style attachment that I removed.  I used that existing hole to place the star on the top of the knitting needle.  I used an awl to make the hole a bit larger so it fit over the tip of the needle.
Decorating for Christmas

Another way to display the tree is to place the whole thing in or on top of a planter.
How to make a tabletop Ornament Tree using a knitting needle

Thursday, November 29, 2012

Candy Serving Tray


Mint Serving Tray
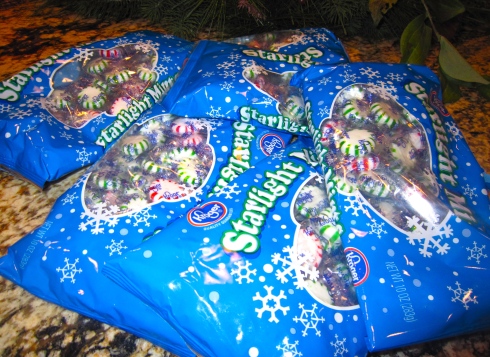
You’ll need:mints
a cookie sheet
parchment or wax paper {I used wax paper, but heard parchment paper works better!}
your oven
How To:1. Heat oven to 350 degrees
2. Place wax paper on cookie sheet
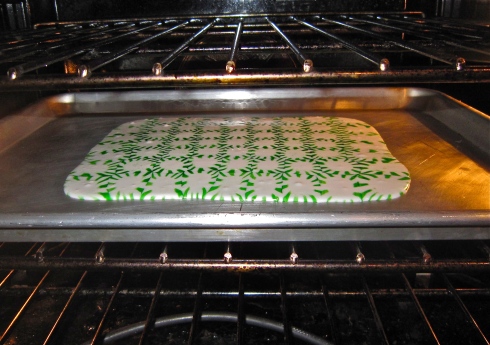
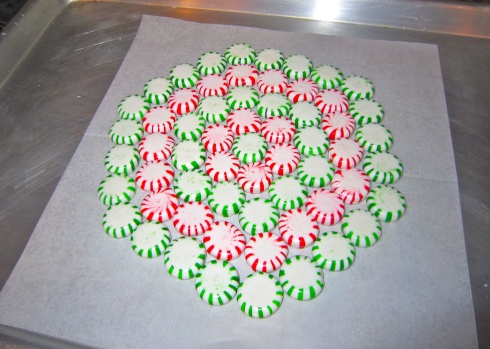
3. Arrange mints in any design you wish on top of wax paper or parchment paper on a cookie sheet {allowing extra room on the sides}
4. Bake for approximately 8-10 minutes
5. Take out and allow to cool on cookie sheet {cools in approximately 5 minutes}
6. Remove wax paper from bottom {be careful, tray is fragile and breaks easily}
Voila!  A beautiful serving tray!
{Don’t forget your wax paper underneath the mints!
… lesson learned on this tray because it never made it off the cookie sheet in one piece!}
My favorite… with Hershey’s Candy Cane Kisses.
Yum!

Wednesday, September 19, 2012

Easy Cake Decorating...


From HERE
This is a tutorial to show you how to decorate a cake that makes you look pretty clever.
The beauty of this method is that you can put anything you darn well want on a cake.

All you need is a picture off the webz (or a coloring book page, or a drawing you did yourself) and you can make any design you want.

First, bake your cake and let it cool thoroughly. It needs a flat top, so do what you have to to make it flat.
IMG_5325cakeicedtb
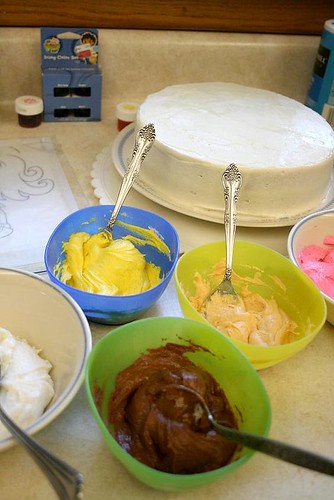
Make your icing; a buttercream made with butter is best. You want an icing that is smooth and soft, but that hardens in the freezer. You will probably want to make a double batch to be sure you have enough to divide into all the colors you need.

*When you make your icing, you will want to sift the powdered sugar and mix the icing up quickly so you don't get lumps. You don't want lumps clogging up your icing tips in your detail work. Your icing should be of medium thickness, not too stiff. Soft peaks.*

Ice your cake. You want a flat-topped cake. The icing job does not have to be perfect, just flat.
IMG_5317picture
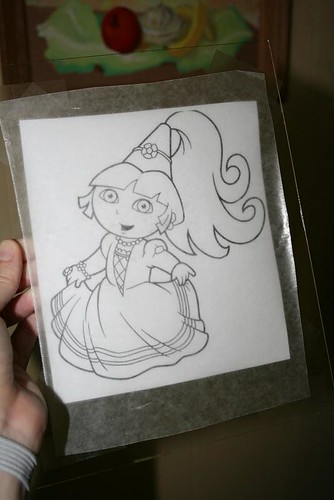
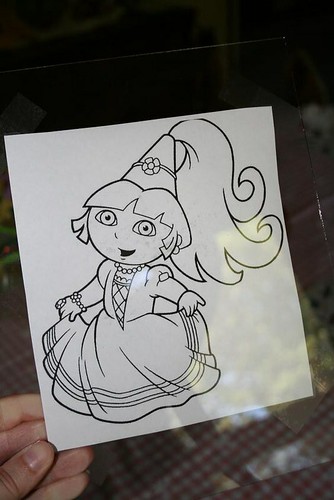
Print out a coloring page, and make sure it is the right size for the top of your cake. You need at least 1/2" space around the edge of your design on the cake.
*your design will be reversed, so if you are doing a team logo or similar, you will want a mirror image of your original printout.*

It is a good idea at this stage to decide how many colors you want to use in your finished design. You might want to mark those colors in the appropriate areas on your coloring page with markers. I didn't this time, because the design was simple and I was lazy.

Trim your coloring page, and tape it to the back side of a flat piece of glass. I always use glass from a spare picture frame.
IMG_5319waxpaper
Tape a similarly-sized piece of wax paper to the front of the glass. Now you have a coloring page/glass/wax paper sandwich.
IMG_5326icingtb
Mix up the colors you will need for your design. Don't forget to include a dark color for outlines and details.

*I prefer to use paste colors because they are vibrant and easily blendable, they don't thin out your icing, and they last pretty close to forever. One little jar of each of a few basic colors will last you for years. Sometimes you get lucky and find a marked-down pack of specialty colors, like I did. If the specialty pack has a couple good basic colors in, or ones that you are likely to use in any case (for example, the Diego colors I bought for $1.99 had a skin color, blue, black, and brown -- all good colors,) by all means -- pick those suckers up, and some for your mommy friends too.*
IMG_5348icingtb
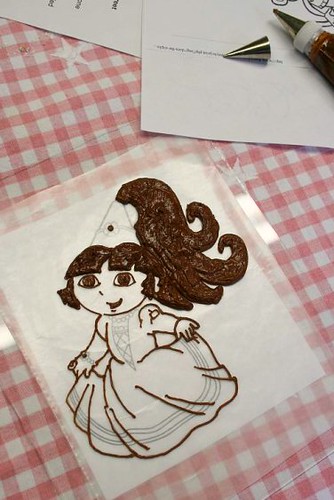
Now the fun part! Fill your icing bags. For the finest details, use a #1 decorating tip -- and you don't have to get fancy if you don't have actual decorating tips, they just make it easier. As you can see in the picture below, for some of the colors I just used ziploc bags with the tiniest speck of the corner cut off.

But for the initial details, you are better off with an icing bag and a #1 decorating tip if you can get one.
Now, trace over the outlines that you want to see on your finished product. This bottom layer will be the top layer -- the one you see -- on your design.
IMG_5349doraicingtb
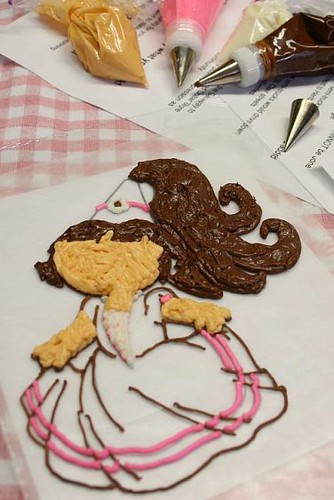
Once your bottom detail layer is established, you can fill in larger areas over the details with other colors of icing. You can't go back in and put details in at this stage if you leave them out, so think logically, one step at a time. It isn't hard and you can fix things later if you need to, so don't stress too much about it.
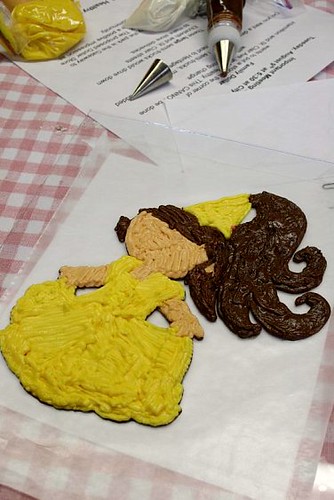
IMG_5350doraicingtb
Color in all the areas with the icing layers to a depth of about 1/4 inch. Fill in right to the edges and on top of your detail lines, so your whole design is supported by that 1/4" thickness of icing.

You can hold your glass up to the light to see if there are any pinpricks of light shining through your icing design, so you can fix those thin areas before you go on.

*This is when your children will come in and inform you that you have screwed up and your icing job was a good try, but it does not look like Dora. You may chuckle to yourself at how ignorant impertinent amazed they will be when you reveal the final design.*

Now, take the whole coloring page/glass/wax paper/icing design sandwich, and slip it into the freezer. You want it in the freezer until the icing is hard to the touch. I don't really know how long that takes, but I'd venture at least fifteen minutes.

IMG_5352cakedecptb
Now is a good time to busy yourself with making the sides and bottom edge of the cake look pretty.
IMG_5353dorapictb
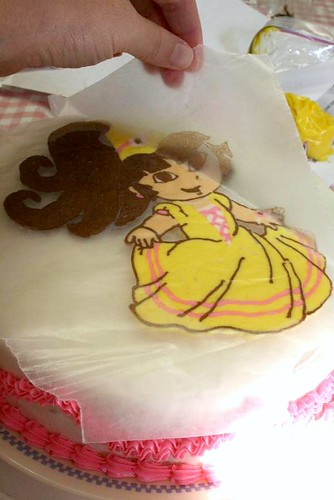
Now -- the magic! Take your coloring page/glass/wax paper/icing design sandwich out of the freezer and make sure the icing is nice and hard.

Un-tape the wax paper/icing, and quickly but carefully, up-end your design onto the cake. Press it down a little so it sticks.
Then, also quickly but carefully, before the design softens, peel back the wax paper to reveal the design.

Now, make the top edge of the cake look pretty with some stars or whatever (a #16 tip is good to use for decorating the sides and edges) and pipe your message.

Voila! You are a genius!
IMG_5355doraicingtb

Tuesday, August 28, 2012

Free Photo Magnet (redeem by 8-29-12)

Get my magnet.  Enter promo code: FREEMAGNET
Click HERE
†One free large 3 3/8" x 4 7/8" magnet offer valid for one-time redemption per billing address and shipped orders only. Taxes, shipping and handling will apply. Offer ends August 29, 2012 (11:59 P.M. PST). For more details, please click here.


Sunday, August 12, 2012

DIY EASY Swim Suit Cover-Up

Post found HERE


You'll need...
1.75 yards of jersey or stretchy cotton material, about 2x your waist measurement OR your waist + hip measurement)
Thread + needle or sewing machine
Scissors
(1) Cut it. Decide the length & width of your fabric. You want it to wrap around your body a bit loosely. I chose to have mine hit just above my knees. You'll also need to make underarm areas. I did that by folding it in half and cutting a deep "C". (*you may need more or less fabric depending on your size- about your waist + hip measurement)
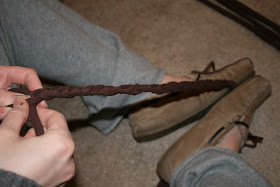
(2) Braid it. Next, take some extra fabric to create the braided straps. I took two pieces of fabric (1 yard by 5 inches) and cut them each into 3 pieces. I did it that way so that even if the little pieces weren't the same width, the finished product would be equal since each strap would be made from 5 inches of width. Knot the ends of 3 pieces together and braid, knot again. Repeat for the other strap. 
(3) Attach it. Pin the braids to the corners of the underarm areas. Adjust the length until they fit your shoulder. Sew them. I used white thread so that you can see, but obviously your thread should match.
Cutting in the angle
(4) Adjust it. Try it on and see if it fits well. Do you need to take more fabric off the sides or bottom? Do you need to shorter the shoulder straps? At this point, I angled one side of the cover up. I may go back and angle both sides. Another option: if it's bunching too much in back, you can add in a tapered curve. Start at one end and slowly increase your curve shape til the mid point and then back up to the other side. About 4-6 inches should be the deepest point- at the middle of the wrap. Remember- you can always cut off more later.
(5) Wear it. Start with the fabric behind you and wrap one side across your body, putting your arm through the strap. Repeat. Move the fabric around so that it lays nicely. Admire. You can choose to hem the entire project if you'd like. With Jersey, it doesn't fray so it isn't necessary, the unhemmed jersey will just roll a bit. Personally, I blog 5x per week + work 50 hours, so I'd rather skip that step. It will look more professional if you hem, of course.

Wednesday, June 27, 2012

Songs for Samplings - Lowered Prices

Remember those excellent children's music CD's I was telling you about that teach the basic truths of the Bibles (important doctrines) to your kids?  Now they're even CHEAPER!  It's so neat that this family wants to teach with this ministry instead of become rich from it!

Songs for Saplings Banner
Reaching Hearts by 
Cutting Prices?
Greetings! 

Let's start with the exciting part in case you don't have
time to read any further:
We've significantly cut the 
price of Songs for Saplings CDs 
and downloads!

Still have a bit of time on your hands? Read on to
find out why we think it's important to lower our prices.

Eight years ago, in an effort to help our kids memorize
scripture, we put some simple verses to music and
watched as our children learned God's Word without
even trying. Songs for Saplings was born! 

Since then, thanks to God's blessings, we have
produced two preschool CDs and are more than
halfway finished with a six-volume set transforming
107 systematic questions and answers about our
 faith into fun and lively songs.

Along the way, God has also provided opportunities
to share our music with new cultures and
languages--places starving for a richer, deeper
understanding of Him and His Word. We are thankful
to report that we've begun projects in Chichewa
(the language of Malawi), French, Polish, and
Russian. You can learn more about our project 
this summer in Malawi by clicking here. 

As our idea of Songs for Saplings' mission has
progressed over the years God has given us the
 conviction that we should see just how far He
can make use of this music around the world.
 
As we've reflected on what that means for our
ministry we've realized we need to find new
and creative ways to get our music into the ears
and minds of more listeners, no matter what
language they speak.

One way to accomplish that is to significantly
lower the cost of getting a CD to you from
about $18 to just $9. No shipping costs. No
 handling fees. Just $9. We've cut the price
of downloads, too: all albums downloaded
 via our web site are now just $5.

This isn't a sale. This is a new way of serving
you that is very exciting to us.

Pray for us that we'll be able to extend our
reach with this new pricing and that God would
continue to bless the ministry of Songs for Saplings.

Your friends,

James and Dana Dirksen

Like us on Facebook                               Follow us on Twitter

A Tool You NEED!

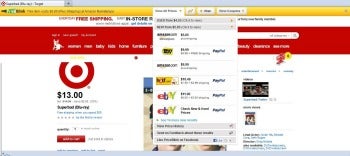
My Husband found this amazing internet tool you can download.  It not only compares an item you're looking at with the internet to see if there is anything cheaper, but it also searches for any coupon codes that might be available.  And it disappears  when you're not shopping!  Check it out and download it, now!!!

http://www.pcworld.com/downloads/file/fid,227113-order,4/description.html


Editorial Review of PriceBlink

The Internet makes it easy to compare prices on just about any product, but it can be time-consuming to search from site to site. Tools like PriceBlink (free) can speed up this chore by scouring the Net for prices as you shop and sending you the prices from competing sites as you search. PriceBlink is a browser add-on with versions that work with FirefoxGoogle ChromeInternet Explorer, and Safari.
PriceBlink screenshotPriceBlink lets you quickly compare the prices on items such as DVDs.PriceBlink does a good job of being unobtrusive, yet readily available. Most of the time, as you bop from site to site on the Web, you won't know it's there. But when you visit a participating e-retailer's website (and if it's major retailing site, it's likely participating), a thin bar pops up along the top of the screen just below the browser's toolbar. On every page of the participating website, the toolbar displays the coupons for that retailer via a drop-down list. Once you click a specific product on the site, PriceBlink will search for other retailers that sell that product for less, offering another drop-down list where you can see competitors' prices. If all of the prices it finds are higher, it will pop up with the phrase, "The next lowest price is $xx at [whatever store]." If it doesn’t find anything, it will pop up with the phrase, "Sorry, no price comparison results found for this product." A third drop-down box, labeled "Wish," lets you name a price for the item you'd like to buy and receive a notification via e-mail when the item drops to that price. You must create an account with an email address and password to use the Wish feature.
Having the shipping cost as well as the base price is the only way to know the real price of an item, so including both is key to making a price comparison tool useful. PriceBlink did include shipping costs, including whether the price includes free shipping, most of the time. But some e-retailers, mainly Amazon, often added the vague "plus shipping," forcing users to click to Amazon's site to find out how much the total cost is there. In my searches, Amazon came up on the list many times even though it often was not cheaper once standard shipping costs were figured in, amounting to a waste of time. PriceBlink's FAQ states that they try to get shipping costs from retailers, but not all retailers will provide that information.
If you're wondering which retailers are affiliated with PriceBlink, go to priceblink.com, where it lists thousands of sites in alphabetical order. The site also lists popular coupons from particular retailers and lets you manage your wish lists and sign up for coupon alerts from individual stores.
Since the price comparison in PriceBlink is brand-focused, it works best for products sold across multiple stores, such as books and electronics. PriceBlink often came up empty for price searches on more proprietary items, such as clothes or furniture. Still, the coupon tool helped to provide a small measure of usefulness where it couldn't offer price comparisons.
PriceBlink is a simple, free add-on that offers a useful service without much fuss, and it understands the importance of doing so silently, which I appreciate.
Note: The Download button takes you to the vendor's site, where you can download the version of the software appropriate to your system and your browser.
--Lisa Cekan

Monday, June 18, 2012

FREE 11x14 Print

Shutterfly is giving away a free 11x14 print!
HAPPY FATHER'S DAY - ENJOY A FREE 11x14 PRINT**
                                             Enter promo code: Y2BP-480H-A2MV-TAHUAG
GET YOUR PRINT