Saturday, December 31, 2011

Random Helpful Hints


Clever idea: box lid cupcake holderVia: realsimple.com
Make an instant cupcake carrier by cutting crosses into a box lid.

Tuesday, December 27, 2011

Random Helpful Hints-Smart!


Clever ideas: store bedlinen sets inside their pillowcasesVia: marthastewart.com
Overhaul your linen cupboard – store bedlinen sets inside one of their own pillowcases and there will be no more hunting through piles for a match.

Monday, December 26, 2011

Christmas Storage, Random Helpful Hints


Clever idea: egg cartons for Christmas ornament storageVia: re-nest.com
Use egg cartons to separate and store your Christmas decorations.

Saturday, December 24, 2011

Friday, December 23, 2011

Random Helpful Hints


Clever ideas: keep a cut apple from going brownVia: athomewithrealfood.blogspot.com
Stop cut apples browning in your child’s lunch box by securing with a rubber band.

Thursday, December 22, 2011

Christmas Star Craft (out of toilet paper tubes)


Easy Holiday Crafts To Do With the Kids

What you’ll need:
- empty toilet paper rolls (each roll makes about one star)
- scissors
- white paint
- glue
- clothespins
- white glitter
How to make it: Grab some old toilet paper rolls, and cut them into ¾” rings. Glue the tips of five rings together, and use a clothespin to hold them together as they dry. Then paint each one white. While it’s still wet, sprinkle with glitter to get the Christmas shimmer of a starry night.


Read More http://www.ivillage.com/kids-christmas-crafts/6-b-296987#ixzz1hIPLlOXv
Sign up for iVillage Special Offers

Christmas Name Card Ideas


Candy Cane Place Card Holder

Christmas is my favorite holiday.  For lots of reasons.  One reason is that my parents host a framily* get together and it is always a wonderful time.  For the last few years, I have prepared a few of the appetizers.  Last year I made little signs to label the apps.  This year I decided to step it up a notch and make these candy cane place card holders to fancy up the app labels. These took me maybe 15 minutes from start to finish.  Super easy and also awfully cute, if I do say so myself.
Start with two candy canes.
Glue the two candy canes together to create the label holder.
Glue on a third candy cane so the holder can stand on its own.
Add labels or place cards and ta-da!
(Yes, these are the apps I'm making for Christmas dinner.)

What You'll Need:
Small candy canes, three for each place card holder, unwrapped
Glue gun
Index cards or other heavy paper for the labels
Pens
Ribbon, optional

Directions: 
1. Place a dot or small stripe of glue along the side of one candy cane and press the second candy cane against the first.  Hold for a few seconds until the glue has cooled.
2. Glue the third candy cane to the back of the first two so that the holders can stand on their own.
3. If using ribbon, now is the time to add a little bow around the three candy canes.
4. Make place cards or food labels out of small tags cut from index cards, or other heavy paper, and pens.
5. Place finished cards in the candy cane place card holders.


Found HERE

Simple! Make and Ornament Tree


How to Make the Knitting Needle Ornament Tree

Supplies Needed:

A mix of round Christmas ornaments in 4 different sizes –for one tree you will need about 20 balls.  At least 4 of each size.
Knitting Needle – 14 inches long (tall tree)  Spray paint the needles if needed to match your ornaments.
Optional: Christmas tree peak topper or a star ornament, ribbon spool, spray paint, scrapbook paper, glue, spray paint, paper cutter
Supplies-Needed to make an ornament Christmas Tree
To make the ribbon spool tree stand: Spray the spool with spray paint to coordinate with your ornaments.  Cut scrapbook paper the width of the spool. You could use ribbon, but I like the more finished look of the paper on the spool.
Decorating for Christmas

Attach the paper with glue. I used Aleene’s Tacky Line Roll Adhesive.
Holiday decorating ideas for Christmas
Attach to the spool.
Ribbon-and-Scrap-paper-stri
Thread the knitting needle up through the bottom of the spool.
Needles-in-Spools

If the spool has a large hole – you can stuff it with pieces of STYROFOAM to make sure the needle stays straight.
Spools-and-Needles

String four large Christmas ball ornaments (about 4” diameter) onto the needle, slipping the metal loops on the balls over the point of the needle. These four balls will form the base of the tree.  If you do not want to use the spool tree stand  and want to make the basic tree – the four balls when placed  squarely on a table will hold the needle upright.
Tabletop Knitting Needle Ornament Tree instructions and tutorial

Next string onto the needle four balls of a slightly smaller size. Each one will fit between two of the larger ones.  Then string on another four, slightly smaller, and finally four more again, slightly smaller, so that your tree has sixteen Christmas ball ornaments in all.  You can add more or less depending on the size of your balls.
How to make a ornament tree using a knitting needle
The tip will look like this.
Ideas for Chistmas decorating

On top of the needle place a Christmas star ornament.  I found this one at Michaels.  It had a “spring” style attachment that I removed.  I used that existing hole to place the star on the top of the knitting needle.  I used an awl to make the hole a bit larger so it fit over the tip of the needle.
Decorating for Christmas

Another way to display the tree is to place the whole thing in or on top of a planter.
How to make a tabletop Ornament Tree using a knitting needle
For the holidays I thought this one would look nice in my kitchen.  Adds some color and festivity to the space by my sink.
Knitting-Needle Ornament Christmas Tree
Found HERE

Wednesday, December 21, 2011

Random Helpful Hints-WOW!


Clever ideas: use a walnut to heal furniture scratches Via: apartmenttherapy.com
Rubbing a walnut over scratches in your furniture will disguise dings and scrapes.

Thursday, December 15, 2011

Random Helpful Hints

Wash your dryer filter: Did you know that cleaning your lint trap with a dryer sheet can ruin it? Dryer sheets cause a film over that mesh that's what burns out the heating unit. You can't SEE the film, but it's there. It's what is in the dryer sheets to make your clothes soft and static free, and smell good. You know how they can feel waxy when you take them out of the box? Apparently that stuff builds up on your clothes and on your lint screen. This is what causes dryer units to potentially burn your house down with it! You can test it by running the lint trap under water. If the water goes through you are good. If not then you need to clean it. The best way to keep your dryer working for a long time (and to keep your electric bill lower) is to take that filter out and wash it with hot soapy water and an old toothbrush (or other brush) at least every six months. 
Drop a small object on the carpet and can't find it.  Place panty hose over the end of the vacuum hose and start vacuuming. The panty hose will trap anything to large to fit through the tiny hose and keep it from getting sucked into the vacuum. 

Saturday, December 10, 2011

Random Helpful Hints

Flexible vacuum: To get something out of a heat register or under the fridge add an empty paper towel roll or empty gift wrap roll to your vacuum. It can be bent or flattened to get in narrow openings.
Pin a small safety pin to the seam of your slip to eliminate static cling. It works; you will not have a clingy skirt or dress. Same thing works with slacks that cling when wearing panty hose. Place pin in seam of slacks and ... Ta DA! ... Static is gone.
Before you pour sticky substances into a measuring cup, fill with hot water.Dump out the hot water, but don't dry cup. Next, add your ingredient, such as peanut butter, and watch how easily it comes right out.
De-fog your windshield: Buy a chalkboard eraser and keep it in the glove box of your car When the windows fog, rub with the eraser! Works better than a cloth!

Friday, December 9, 2011

Random Helpful Hints


Expanding Frosting: When you buy a container of cake frosting from the store, whip it with your mixer for a few minutes. You can double it in size.  You get to frost more cake/cupcakes with the same amount. You also eat less sugar and calories per serving. 
Reheating refrigerated bread: To warm biscuits, pancakes, or muffins that were refrigerated, place them in a microwave with a cup of water. The increased moisture will keep the food moist and help it reheat faster.
Newspaper weeds away: Plant your plants in the ground, work the nutrients in your soil. Then wet newspapers, put layers around the plants overlapping as you go, cover with mulch, and forget about weeds. Weeds will get through some gardening plastic they will not get through wet newspapers.
To keep squirrels from eating your plants, sprinkle your plants with cayenne pepper. The cayenne pepper doesn't hurt the plant and the squirrels won't come near it.

Thursday, December 8, 2011

Random Helpful Hints


Add garlic immediately to a recipe if you want a light taste of garlic,  and at the end of the recipe if you want a stronger taste of garlic.
Reheat Pizza Heat up leftover pizza in a nonstick skillet on top of the stove, set heat to med-low and heat till warm. This keeps the crust crispy. No soggy micro pizza. I saw this on the cooking channel and it really works.
Easy Deviled Eggs: Put cooked egg yolks in a zip lock bag. Seal, mash till they are all broken up.  Add remainder of ingredients, reseal, keep mashing it up mixing thoroughly, cut the tip of the baggy, squeeze mixture into egg.  Just throw bag away when done easy clean up.

Wednesday, December 7, 2011

Make Your Own Glittering Holiday Candles with Epsom Salt!


Looking for beautiful holiday decorations?  Or maybe you need an inexpensive gift idea that’s simple enough for a toddler to pull off!  Either way, frosted candles are a great option.   You can use candles from Walmart, the dollar store, or even used candles that you have around your house!   Purchase Epsom salt at any drugstore.  A 4 lb carton filled with Epsom salt costs about $4.
Supplies Needed:
  • Epsom salt
  • Mod Podge
  • candles
Directions:
  1. Spread out some Mod Podge on waxed paper, a plate or an easily-cleaned surface.  Spread out Epsom salt as well, on a separate surface.
  2. Roll your candle in the Mod Podge until it is covered. (Not the top or bottom, though!)
  3. Then roll the candle in your Epsom salt and let dry.  Ta-da!

Tuesday, December 6, 2011

Discounted Red Box and Free Rental

Redbox has raise their prices from $1 rentals to $1.20.  However, for now, if you reserve the movie online and pay for it, then go pick it up, you can get them for $1.  It saves 20 cents. However, the first time you do this, you get a free rental credited to your account.  So your second movie that you reserve online is free!  Just make sure to click "apply my free rental credit" when reserving your second title.  The free credit won't be applied until you've picked up your first rental.

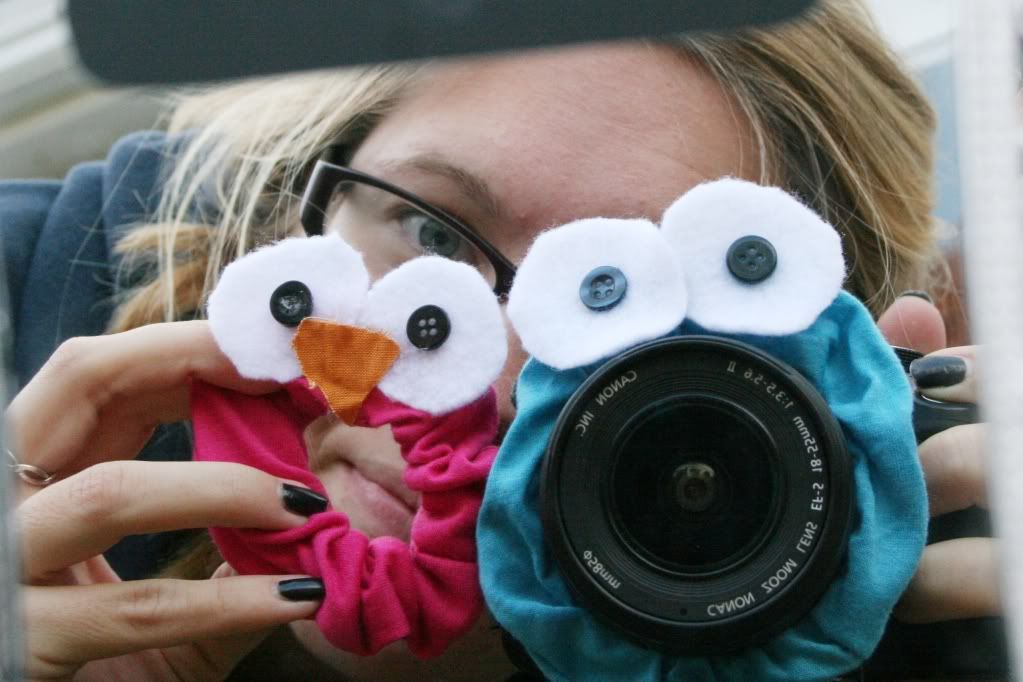
Birdie Lens Scrunchies


Have you seen lens scrunchies? They are fabric scrunchies, decorated with eyes, and slipped onto your lens. The scrunchies helps draw a child's attention to your lens, in order to get a good photograph! 

This simple birdie lens scrunchies takes about 2 minutes to make
You can make a "cookie monster" one too!


You can usually pick up a 3 pack of scrunchies from the $1 store.

Then use items you may have laying around the house- white felt, black buttons, and orange fabric for a beak! Hot glue them all together.


Article found on A Law Student's Journey

Monday, December 5, 2011

Box Tops for Education Online, Plus High Value Coupons!


If you have school-age kids, chances are you already save your boxtops.  But did you know that you can help out even more by signing up and earning points online, plus get high-value coupons?
  • Just gohere to sign up.
  • After you sign up, make sure to click on the “earn” tab to see all the different ways you can earn points for your school!
  • Even better, this website often has high-value coupons that you won’t find other places :).  And you can never have too many coupons!

Sunday, December 4, 2011

Make Your Own Stamps!


This personalized stamp makes it fun to sign holiday cards, thank-you notes, and artwork.
Materials
  • wooden block or scrap wood
  • paper
  • pencil
  • white dimensional fabric paint
  • ink
  • scrap newspapers
Instructions
  1. Start with a wooden block or piece of scrap wood, then cut a piece of paper to fit one side.
  2. To create the reversed letters for the stamp, have your child write her name on the paper or write it for her. Go over the letters with a pencil so that they're thick and dark.
  3. Place the paper facedown on the block and rub the back of the paper to transfer the pencil marks.
  4. null Trace the letters with white dimensional fabric paint, keeping the thickness of the lines consistent. Gently tap the block against a table to even out any bumps in the paint. Let it dry.
  5. To use, place the card to be stamped on a stack of newspapers. Ink the stamp and press it onto the paper.

    From FamilyFun Magazine