This is a really neat idea! Take your old Starbucks Frappuccino bottles (or maybe even an old vase from a thrift store, be creative!) and spray paint it. Then, using adhesive letter cut-outs, make some neat holiday vases. Or Spring, or Fall, or whatever the season!
Tuesday, January 31, 2012
Monday, January 30, 2012
DIY Candle Holders
(images via: fossil blog)
Add rustic beauty to your mantle with twig candle holders. This DIY project is simple and natural, using just a flat candle holder (check thrift stores!), garden pruners, craft adhesive and dry tree or shrub branches of your choosing. The same concept could be used on vases or other decorative items.
Found HERE
Sunday, January 29, 2012
Saturday, January 28, 2012
Friday, January 27, 2012
Colored Ice Cubes
Imagine the possibilities! You could even do pink ice cubes in lemonade or create color combinations for each of the holidays!
Thursday, January 26, 2012
Cleaning Stove Burners & Grates using Ammonia (The best, easiest, cheapest way EVER.)
Article found HERE
don’t you judge me.
I cook. A lot.
These were my stove burner/grates.
Yep. They were so bad that I am almost embarrassed to put a watermark on this photo. You cook... oil and grease spatter... they get heated and reheated and then pretty soon you have a disgusting coating that will not. scrub. off. ever.
What to do...? Stop. Scrubbing.
Remember ammonia? Basic ammonia? Take about 1/4 cup of ammonia and seal it up with one of the burners in a large ziploc bag. You only need a little amonia in the bag. You are not trying to soak the burner… you just want to seal it up with the ammonia fumes.
I leave it outside on a cookie sheet overnight. (You can leave it inside, but I move it outside just in case the bag springs a leak or something. Stinky.) It is the fumes from the ammonia that dissolves all of the grease and hardened oil. You don't need to soak it, it just needs to be sealed up with the ammonia fumes.
When it’s done sitting, it should wipe clean with a sponge.
See how amazing? It’s the same burner. Easy peasy, no more greasy.
Why buy expensive cleaners and/or use a lot of elbow grease? Cheap ammonia and 12 hours = totally clean.
What would you do with extra time and money…?
You. Are. Welcome.
*****Updated: Never, EVER mix ammonia with anything that has bleach in it. It creates toxic fumes. (In general, I suggest you don't play chemist and try to mix ammonia with anything, period.)*****
Wednesday, January 25, 2012
Dollar Store Plastic Animal Bookends
Here's How:
To make plastic animal bookends, you will need:
dollar store plastic animals
sharp scissors
strong craft glue
acrylic photo frames
spray paint (optional)
I was so excited to get started on this project, that I didn’t take a before picture of the plastic toys. Whoops.
To bisect the toys, I just pierced the animal in the midsection (this is beginning to sound like a biology lab) with my scissors, and cut all the way around. I was careful to keep my cutline as straight as possible.
One the toy was halved, I applied a generous layer of glue to the cut edge and stuck the toy onto the frame. It took a little trial and error to correctly place the toy so that the animal’s feet touched the ground when the bookend was standing.
Once the animal halves were in place, I left them to dry. This is always the hardest part for me.
I think these tiger bookends are hilarious, but I can’t tell you exactly why.
Animal bookends would work equally well in a circus- or a jungle-themed room. If you are lucky enough to have a favorite professional sports team with an animal mascot (Go, Detroit Tigers!), these could even find a place in a teen’s room or Man Cave!
To take the project one step further, I hit an elephant and a lion head bookend with a coat of Krylon’s Oil Rubbed Bronze. Satin-finished gold or antique copper spray paint would look very chic too.
The plastic toy and acrylic frame took the spray paint well, no priming necessary. Just use a light hand on the frame to avoid drips.
I adore the curve of the elephant’s trunk. I would be really surprised if a house guest could pick these out as dollar store toys!
For a funkier take, you could choose less traditional animals (my dollar store also had hippos and giraffes) and paint them in a trendy neon color. It would be a snarky nod to the traditional animal bookend with a modern twist.
I hope you will give these bookends a try. It’s a project that can easily be completed in an afternoon with such satisfying results!
Article Found HERE
Tuesday, January 24, 2012
Free Valentine Card @ TinyPrints.com

Enjoy one free Valentine's Day greeting card using the code TPGFREE17A at checkout. Click the photo above and it will take you to the website. Offer is limited to one free greeting card per household. Offer applies exclusively to Valentine's Day greeting cards and is not applicable to previously placed orders or toward the purchase of stationery. Offer is only valid on Tiny Prints Greetings and is not applicable to third party or partner websites. We reserve the right to discontinue or modify this offer at any time without notice. We reserve the right to cancel any order at any time. Offer expires 1/25/12 at 11:59 pm (PT).
Psychedelic Stair Renovation!
This article was found HERE
The attic stairs are done... and there's no doubt, it's a huge improvement!
I decided to go bold, so I attached Behr paint chips to the walls- working in a slight dark to light gradient (...and don't worry! Home Depot was quite willing to have me take all of these paint chips- I asked first!). Aside from the paint chips, everything else was stripped (3-4 layers of wallpaper- yuck!), cleaned, prepped, and painted white. We also installed a runner made from rag rugs my Grandmother made. It feels so much brighter and cleaner. All said & done, I rang in with atotal cost of $16. We spent $4 on a ventilation mask for me to wear and $12 on 2 bottles of spray adhesive.
I just love how fun and colorful this space is now, and it's so much more appropriate for the nursery! Jesse and I both agreed reading through the paint chip names is quite amusing too, so maybe someday our little one can practice reading off names like "Majestic Mint," "Lemon Tart," and "Feather Plume."
Perhaps most important is that the stairs withstood their first test! We successfully moved a very large, heavy piece of furniture up them (more on that later!), and the runner made it a lot easier while holding up fabulously. The dogs are also no longer afraid to wander up them, which gives us one more thing to worry about when we're in the attic. :)
Monday, January 23, 2012
Re-Make an Old Filing Cabinet
Found HERE
Blue File Cabinet Revamp
Project Estimate:
- Metal file cabinet, on hand
- Can of Krylon Dual Paint, about $5
- Sand paper, on hand or $1
- White paint pen, on hand or about $3
Total: $5 and up
Tools:
- Screwdriver (to remove hardware)
- Paper towels or rag to clean cabinet
- Drop cloth (sooo worth the $5 investment) or newspaper/cardboard to cover work area
Before You Spray Paint a File Cabinet
Spray painting is very easy. Anyone can do it, BUT there are a few simple steps you should take to prepare your project to ensure that your spray painting experience is as successful as it can be.
To prep your surface, you should:
- Clean it with soap and water and dry it off
- Sand it lightly to scuff up the surface (this will allow the paint to adhere)
- If there are any rusty parts, sand them more
- Wipe off dust with a wet paper towel or rag and let it dry
- Remove hardware with a screwdriver (this only took about a minute! easier than masking)
- Make sure your work surface is covered with a drop cloth or enough newspaper/cardboard
- Shake the can of paint according to instructions, or for 2 minutes
- Wear gloves before you spray!
With Krylon Dual Paint, you don't have to prime your surface, but if you are using another kind of paint, you will get the best results if you prime first.
How to Spray Paint Metal
One of the cool things about Krylon Dual Paint is that it works on metal and a bunch of other surfaces. Other tips for successful spray paint finishes:
- Make sure can is shaken before you start, and shake every 15 seconds while spraying
- Keep spray can 10-12 inches from surface (keep this consistent)
- Start your spray off the edge of the surface and spray in long sweeping motions to the other end of the surface (don't stop your spray in the middle of the surface)
- Do two or three light coats and allow to dry between coats
- Overlap each pass by 1/3
Pinstriping the File Cabinet
I spray painted the file cabinet with a single can of Krylon Dual Paint in True Blue. This was the most successful spray paint experience I have ever had. The spray paint went on evenly and a single can provided full coverage for my two-drawer file cabinet.
After the paint dried, I added white pinstriping with a paint marker. I wanted the stripes to look hand-drawn, so I didn't use a ruler or any masking, but if you want perfect lines, I suggest masking out your area with painter's tape and using acrylic paint instead of a paint marker.
Start your pinstriping on the back or side of your furniture so you can get a feel for how the paint marker works on a side that won't see as much prime-time action.
Even if you want your striping to look hand-drawn, you will have to be careful. There is quite a bit of drag with the paint marker. I found that it worked best when I:
- Started from the bottom and drew the lines upward
- Extended my arm and continued the line all the way from bottom to top without stopping
I love how this file cabinet turned out -- it went from an unloved piece of junk in the garage to one of the most stylish pieces in the house. I am going to use it as a bedside table. And if it's not too matchy-matchy to have more than one blue pinstriped piece of furniture, I might just have to give the old blueprint treatment to some yard sale furniture finds this summer.
Sunday, January 22, 2012
Toilet Paper Roll Wall Art
This article was found HERE


Toilet paper roll wall art


<
I have a vast space above my front door that needed something... I decided to turn to toilet paper rolls. Inspired by the lovely wall art on http://www.growingupcreative.com/2009/10/eco-kids-craft.html, I determined to do my own super-size creation.
Here's how I did it:
1. Collected 135 toilet paper rolls from everyone I knew
2. Folded the tp rolls and cut into five sections (I didn't measure but just eyballed my cuts)
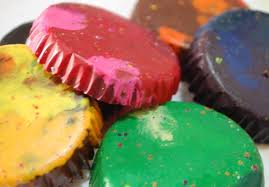
Recycled Crayons
Recycled Crayons
In a muffin pan, place cup cake liners in each space. Fill each one 2/3
full with crayon stubs (without paper). You can fill each paper with
similar colors or random! Bake in the over at 275 for 10 minutes, or
until crayons are melted. Remove and let an cool to room temperature.
Put pan in freezer to harden the crayons faster. Remove from the pan
and paper. You will have new crayons in a fun new shape!
If you want crayons with a smooth edge, you can do it without the muffin papers.